by Ben Brewster
For 2019, our plan is to break down 25-30 of the most common mechanical flaws that we see, and give some insights into how we address them with our athletes. This is by no means an exhaustive list, or to say that these cues or tips will work for every guy, but we’ve had success in implementing these recommendations with our guys.
So today let’s discuss what is a “pushing” arm action. Pushing, in this case, refers to either one or (often) both of the following:
#1: The elbow getting in front of the line of the shoulders at the point of maximum external rotation, and continuing into release.
#2: A forward flexing of the trunk into ball release, rather than continuing to rotate around the spine through release, leading to a similar tricep driven “push” into ball release.
Take a look at the pic below of Garrett Richards at maximum external rotation. Notice that he is keeping the elbow in line with the shoulders both top-to-bottom and front-to-back, with the ball laying back perfectly in the plane of shoulder rotation (the plane of rotation is the yellow line connecting his shoulders). If he were pushing, you would see the elbow creeping forward to where the top red ‘X’ is, which would indicate he was not relaxing the arm into layback and would therefore be forced to utilize his tricep to a much greater extent to extend (push) the elbow into ball release, rather than pulling into horizontal adduction and internal rotation like the vast majority of high level throwers do.

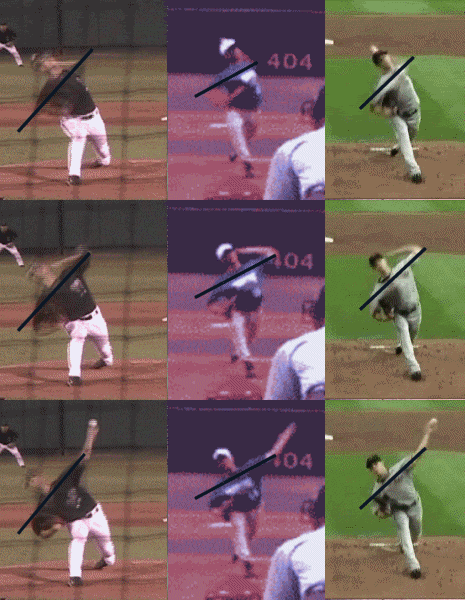
Now let’s examine forward flexing of the trunk into release. I dug these gifs up from back when I had this issue in high school and was desperately trying to understand it. Notice how in these three MLB’ers continue to rotate around the plane of shoulder rotation (the black line) through release, which is a plane perpendicular to their spinal angle.
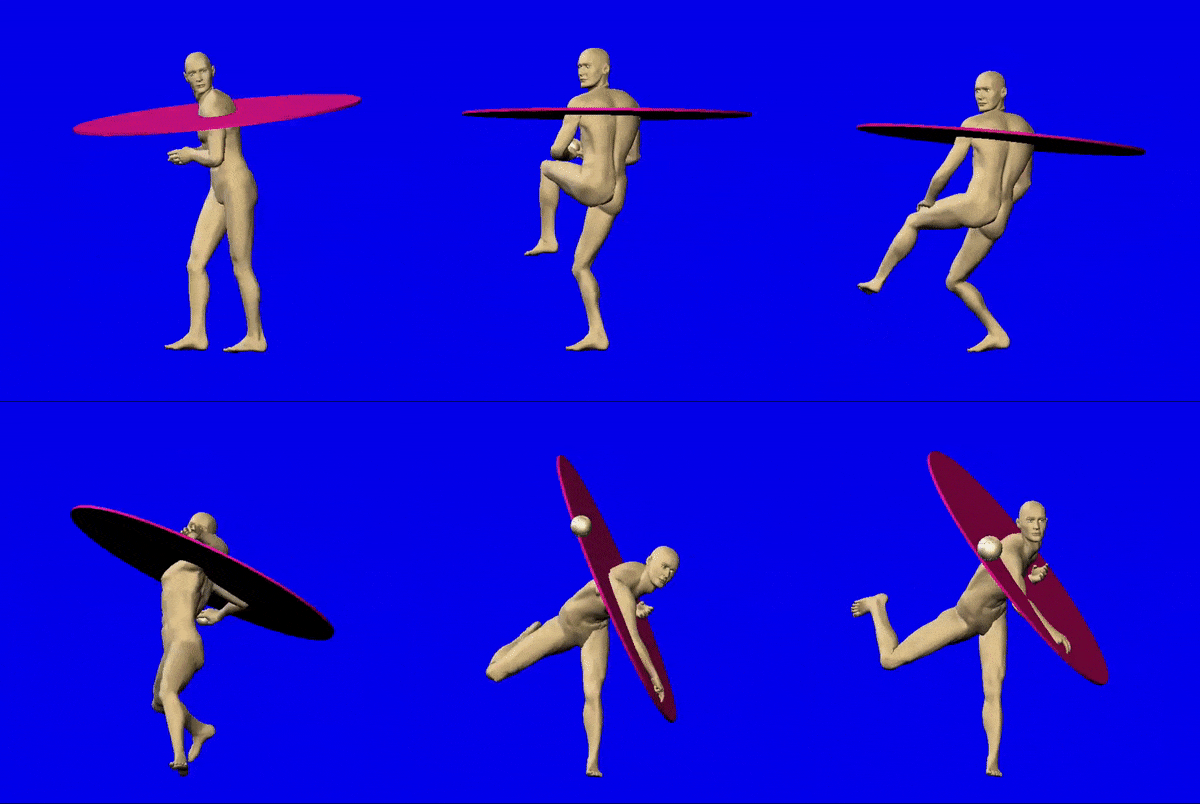
Alternatively, this gif from Paul Nyman from over 12 years ago is still one of the best depictions of throwing in the plane of shoulder rotation that I’ve seen.
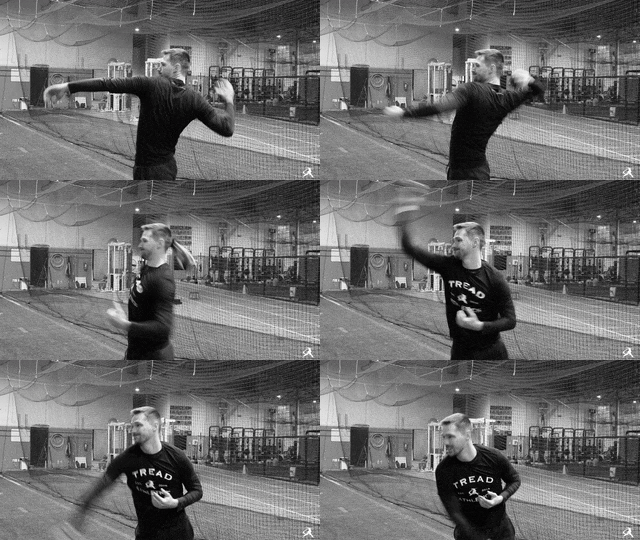
….and here was me.

This was back when I threw 73 miles per hour. Notice how my rotation does not occur perpendicular to the spine, and I am finishing the throw via this forward trunk flex. Also notice how this led me (someone with plenty of shoulder external rotation), to not even be able to elicit a full 180 degrees of layback due to the fact that I was not lining that layback up in the right plane of rotation.
So not only does pushing rob you of velocity by limiting your ability to fully utilize your powerful horizontal adductors and internal rotators (triceps instead of pecs/lats), but the most common complaint we see from nearly every athlete who falls into pushing patterns is distal tricep, and sometimes medial elbow pain.
“The most common complaint we see from nearly every athlete who falls into pushing patterns is distal tricep pain.”
I’m not saying that fixing this flaw will prevent any and all arm injuries (we all know throwing a baseball hard is playing with a loaded gun, even if you control for all the risk factors as best as possible), just that pushing seems to continually create aches and pains in many athletes who otherwise didn’t have any before falling into this bad habit.
But what causes a pushing arm action, and is there any way to fix it? Let’s discuss this very question, with some of the most common causes (and solutions) that we have seen with our athletes.
1. Going too heavy on weighted ball / plyo drills
I first noticed this myself back in 2014 when attempting to go through a standard plyocare routine. In utilizing the 2 and 4 pound plyocare balls, I noticed that my arm was protectively tensing up into layback, not allowing me to relax the anterior shoulder and fire as reflexively from my pecs and lats. Rather, my body’s default pattern with this load was to shoot the elbow forward and extend the elbow via the tricep to throw the ball.
I’ve seen this phenomenon occur more times than I can count, to where I no longer use a 4 lb ball for throwing for any of my athletes, or a 2 lb ball for youth athletes. Even with older athletes, I still keep an eye on any 2 lb ball throwing they do, and cut it out if I notice they are not able to relax into layback and keep the elbow behind the line of the shoulders at max external rotation.
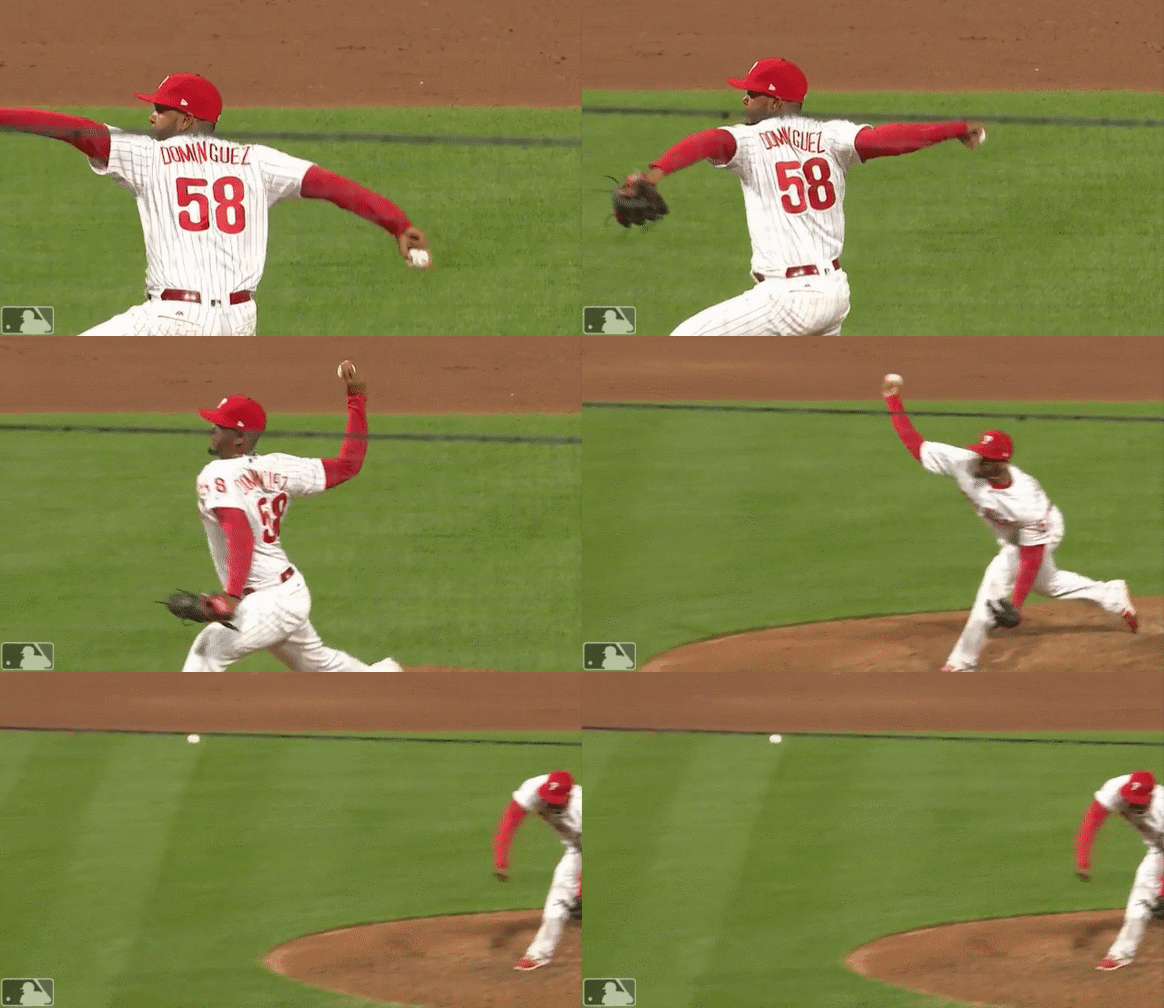
Heavy balls have their place, as I’ve written about in the past, but you’ll know you’re going too heavy once a cleaner arm path starts to turn to a pushing arm action.
“You’ll know you’re going too heavy once a cleaner arm path starts to turn to a pushing arm action”
The Solution: be very selective about using ball weights over 1 lb for high school and college aged pitchers (I’ve found that 2 lb is okay for most of these guys at sub-maximal efforts on arm action drills), and avoid 2 lbs or above completely for youth pitchers.
2. Yanking the ball across body on Plyo drills
Another common cause for developing this habit on plyocare drills is standing too close to the wall and trying to hit the wall directly in front of your face. This either leads to a cutting action on the ball, a pushing finish to throw throw, or both.
I talk about this in more depth here:
One solution: think about rotating your back shoulder through the target, and let your arm go where it would naturally go to accomplish that (the ball should hit the wall slightly arm side of the target). Consider this screenshot of Jake Arrieta demonstrating this concept below. You can try marking the plyocare wall with a vertical strip of tape and an ‘X’. Make sure not to just change your pushing to being in the direction of the ‘X’, and actually rotate the shoulders through the target. Additionally, backing up from the wall a few additional feet can help.

3. Over-cueing strike throwing
This happens at every level, but especially at the youth level. “Just throw strikes” isn’t a good cue if athletes’ brains interpret it as I better get as linear as possible and throw darts to make sure coach doesn’t yell at me again for walking a batter. Keeping a delivery on line is a balance of violent, well-timed rotation that maintains direction towards the target without resorting to forward flexing the trunk and pushing the ball (a low level movement solution to this problem).
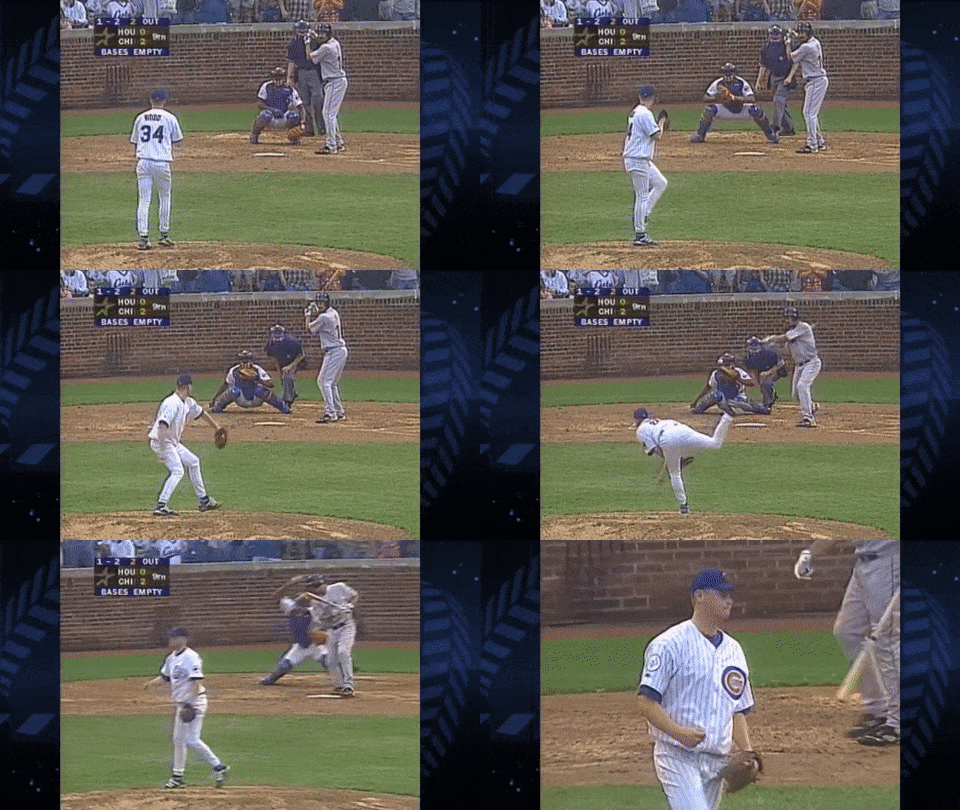
One Solution: while there are many possible solutions, and not every athlete will be negatively affected by the strike throwing cue, we’ve seen that long toss is an excellent way to train this. By using the distance constraint, it encourages a rotational, high intent finish (as pushing will lead to noticeably less distance on the throws), while still encouraging these throws to stay on line (as the immediate feedback will be obvious if the ball runs or cuts 20 feet to either side of the target). This immediate feedback and blend of distance and directional constraints all in one is a big reason why long toss is so incredibly effective for many (but not all) athletes.
4. Flying open with upper half
Another cause of a pushing arm action or linear finish is the inability to keep the torso closed at landing. This leads to a linear finish, which, as we discussed earlier, tends to go hand in hand with a pushing arm action. When the shoulders land completely open, there is nowhere to go with the throw but to finish linearly, as you can see from this following clip of one of our remote athlete’s original mechanics:
One solution: keeping the shoulders closed at landing and improving hip/shoulder separation is a topic for another post, but suffice it to say that if you can improve that relationship, the arm has a better chance of staying in the proper position during trunk rotation and through ball release. One drill that we use with many of our athletes is the roll in, although we don’t prescribe it for every athlete primarily due to individual hip anatomical differences.
5. Compensating for current or prior injury
A particularly tricky cause of a pushing arm action is a mechanical compensation due to a current or prior injury. A number of structures are stressed during trunk rotation, layback and internal rotation into release. For the arm to “allow” this motion to occur and fire through these positions, the brain needs to believe that the tissues will be able to handle these given loads at those specific joint angles. It’s extremely common that athletes might suffer a bicep tendon, labrum, rotator cuff or medial elbow injury and come back “cleared” to throw but with an altered arm action.
This is more common with athletes who spend a long period of time trying to throw through these injuries or who are rushed back from the injury, as it will be more likely that they are building patterns that compensate around the injury to minimize pain and/or stress to that area. As such, it can be a tough cycle to break once you have built up bad patterns.

One solution: make sure to not progress too fast through rehab protocols or arm rehab drills. Focus on doing them properly, and through full ranges of motion. When you do get back to throwing, focus on the quality of the throws rather than just building up intensity quickly, and if there is a noticeable tissue block, get that addressed before brute forcing your way through the rehab and creating even more bad habits.
6. Tissue restriction preventing smooth layback
Similar to #5, although not necessarily as a result of an injury, tissue restrictions can often create very real limits to the positions a thrower is able to work through. Quite often, pushing arm actions go hand in hand with one of the following areas being overly tight / toned up / dense / fibrotic, listed in our observed order of prevalence:
Pec major / pec minor / subclavius
The pec minor is probably the biggest offender here. Getting in there with targeted manual therapy or partner release work, or working on it solo with a barbell (video further below) can be game changers. Don’t overlook the subclavius either – a sticky one can lock the clavicle down and prevent it from rotating or elevating cleanly to allow scapular posterior tilt (an important part of layback) to take place.

Let’s take a look at some dynamic movements of the scap (I couldn’t isolate the throwing motion in this app, regrettably). First, let’s look at scapular upward rotation, a necessary piece of the arm action (and to get overhead in general).
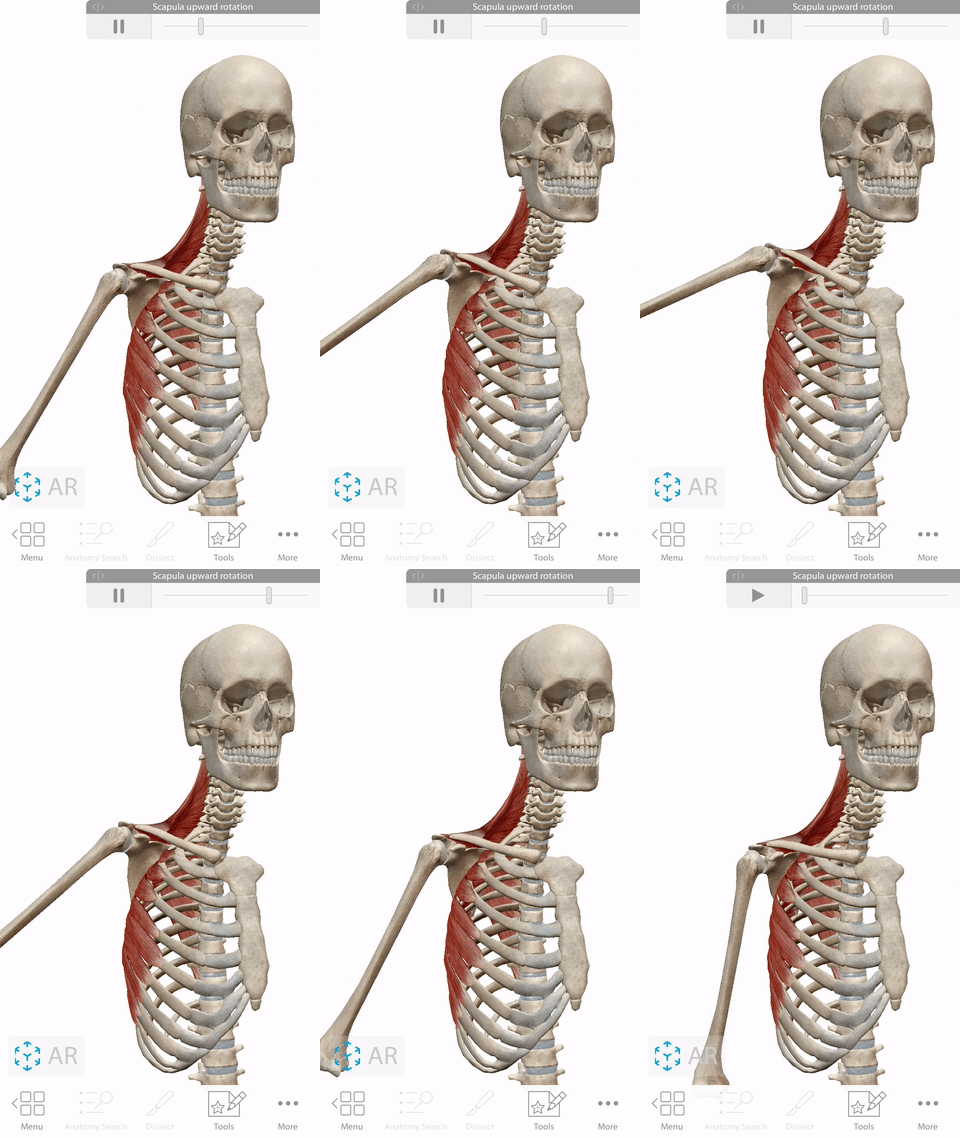
Notice how the clavicle must elevate in concert with the scapula. The pec minor and subclavius both oppose this motion. If we could see external rotation at 90 degrees of abduction (similar to layback), you’d see the clavicle must also rotate to allow the scapula to tilt posteriorly during layback. Next, let’s look at scapular abduction/adduction (i.e. protraction/retraction). Again, notice how the pec minor (shown) directly opposes retraction.
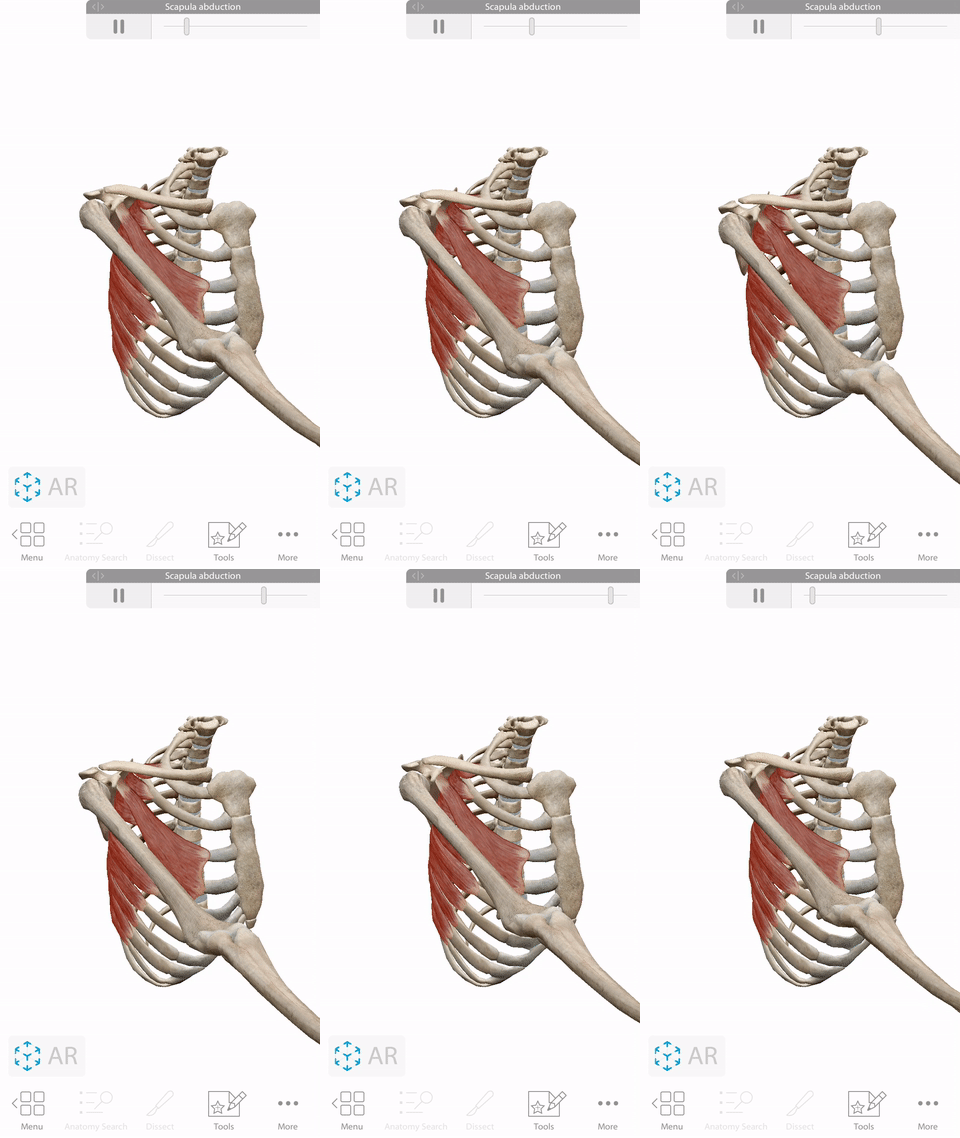
Keeping these tissues from getting dense, shortened and fibrotic is incredibly important for maintaining a clean, loose arm action (see Yordano Ventura, below).

Upper trap
This is somewhat counterintuitive but we have seen issues where balled-up, tight upper traps were not only leading to the elbow climbing a bit higher than shoulder height during the arm path, but also preventing clean and relaxed layback. This can be addressed with a number of approaches including manual therapy, Self Myofascial Release or SMR (video below) and dry needling. If you are one of these upper trap dominant athletes, this video explains the basics of how to adjust your lifting form to stop reinforcing this pattern.
Lat / tricep (long head)
These two muscles can also create some issues as far as instigating a pushing arm action. Both are placed on stretch at max external rotation, so being overly tight in either area can prevent the elbow from staying back in the line of the shoulders.

More importantly, the lats should be addressed from a tissue quality standpoint as it can lead to poor scapular movement as well. We use a number of specific partner and self myofascial release drills with our remote athletes to address these two areas in particular.
You can see a few of the self-myofascial release options we use with our remote athletes below:
7. “Fake” External Rotation
Sometimes, athletes want so bad to force layback that they actually end up pushing the ball. From the side, a pushing arm action gets the forearm horizontal and would falsely appear to be reaching 180 (or more) degrees of layback.
Unfortunately, this layback is actually elbow flexion masquerading as layback/external rotation, which is why this tends to not lead to measurable improvements in performance when an athlete “gains” layback in this way.

One solution: rather than forcing external rotation and layback to occur by shooting the elbow forwards, try targeting the surrounding soft tissues that can contribute to poor layback (as outlined in #6). The degree of layback does have some genetic components as well as being related to having a throwing history in childhood (which creates humeral retroversion) and lends itself to more external rotation as well.
Closing thoughts
This is by no means an exhaustive list on what can lead to a pushing arm action, but it’s a decent start. Take some time to evaluate yourself (or your pitching staff) for this mechanical flaw, and work to clean up the underlying cause once you identify what it is. While some athletes can reach relatively high levels of the game with an extreme pushing arm action, it becomes exceedingly rare at the higher levels. Give these tips a try and, as always, email us if you have any questions.
Here’s to reaching your potential.
Ben
Athletes or coaches interested in remote one-on-one or team programming? Reach out via this application form.

